
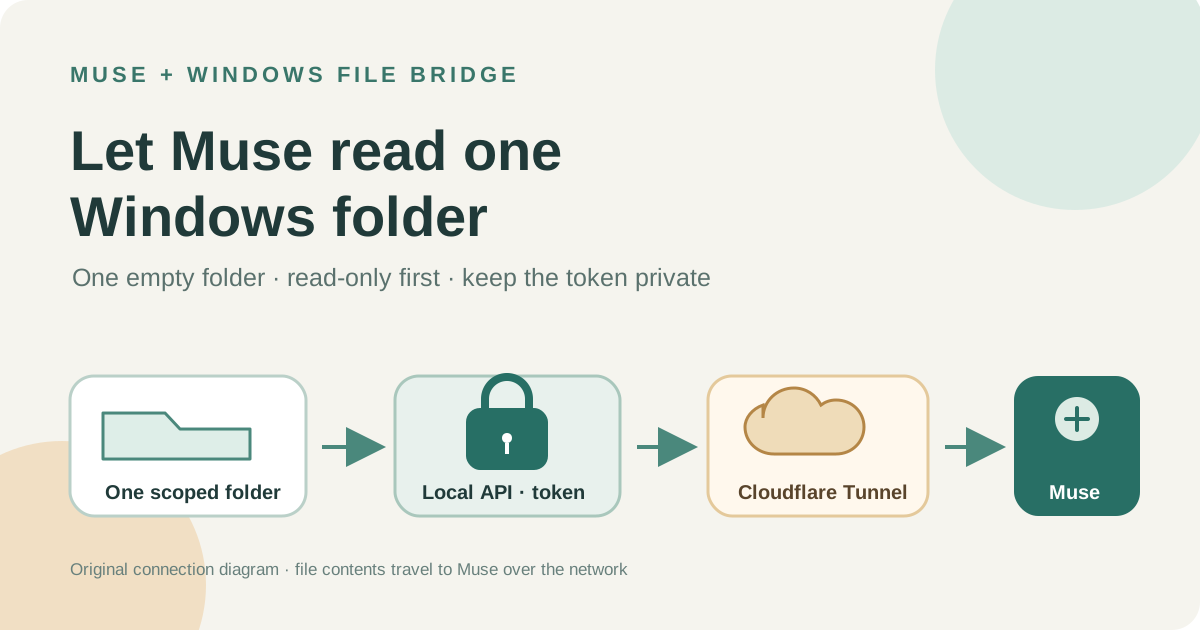
This guide focuses on “Muse Windows local files” and turns the question into practical steps you can check.
01 | Know what the bridge exposes
Muse File Bridge is a community project published by TTNAN. It is not a Meta Windows desktop app or an official Meta connector. It starts a Python HTTP server on Windows that listens only on 127.0.0.1:18790, then uses cloudflared to connect that service to a Cloudflare Tunnel. API calls still need a bearer token, and the server resolves the requested root name and relative path against the folders in your config.
This lets Muse request real local files, but their contents travel over network requests to the remote Muse environment. It is not local-only processing. Start with a new, empty folder. Do not expose your entire user profile, Desktop, Downloads, identity documents, customer files, or password stores. The repository describes its default as read-only and documents the API limits. This guide follows the main commit available on October 2, 2026; it has not been run on your Windows PC or Muse account.
02 | Check the repository and installer first
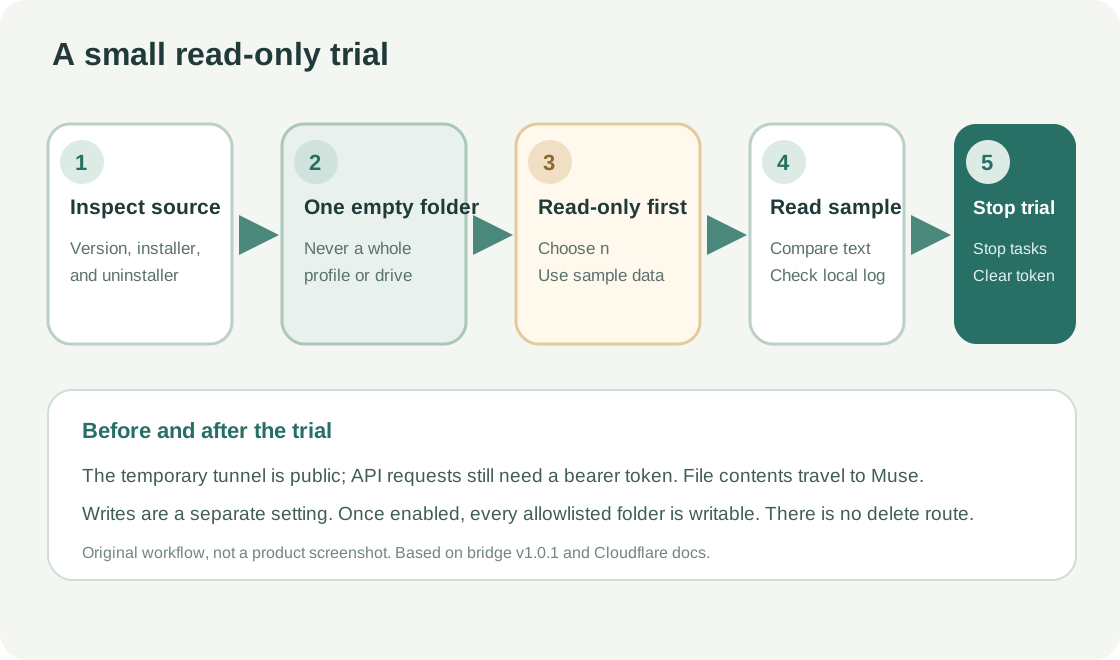
The reviewed public repository is TTNAN/muse-file-bridge, licensed under MIT. The inspected main commit is 0646361a8359f5ff2d3c372b4c5dc5005d6d3542, and the changelog reaches version 1.0.1. The repository contains a PowerShell installer, Python server, command-line client, and uninstaller.
The README lists Windows 10 or 11 and Python 3.9 or newer. The installer tries to install Python 3.12 and cloudflared through winget, then copies the server into %USERPROFILE%\.muse-bridge. Download the ZIP from the repository, inspect install.ps1, server/muse-file-api.py, and uninstall.ps1, and only then run the installer. Use ExecutionPolicy Bypass only after you have checked the source and understand what it changes.
03 | Start with one empty folder and read access
Open PowerShell in the extracted folder that contains install.ps1. On a first install, pressing Enter at the folder prompt selects Documents\MuseBridge; check that it contains only the small set of non-sensitive files you intend to expose. When asked whether Muse may write files, enter n so read_only stays true. If an older config already exists, the installer skips the defaults, so inspect every root in %USERPROFILE%\.muse-bridge\config.json before starting the service.
Run powershell -ExecutionPolicy Bypass -File .\install.ps1. The script creates two logon scheduled tasks named MuseFileBridge API and MuseFileBridge Tunnel, so closing PowerShell does not stop them. A Quick Tunnel is useful only for a short trial. Do not use it to expose sensitive files. A named tunnel needs your own Cloudflare domain and login. The installer does not create a Cloudflare Access sign-in policy for you.
04 | Give Muse the tunnel URL and keep the token in a credential field
At the end of setup, the installer prints either a temporary trycloudflare.com address or the hostname you bound to a named tunnel. Cloudflare describes Quick Tunnels as a testing and development feature. Anyone with the URL can reach the mapped service entry point, and the URL stops working after cloudflared stops. There is no uptime guarantee. The bridge still checks a bearer token for API requests, but the public URL itself is not access control.
The repository’s CONNECTOR-BRIEF.md is the author’s setup brief for Muse and lists endpoints such as /api/health, /api/list, and /api/read. Meta Help says you can ask Muse to create a custom connector and that Muse guides you through setup; you may need to provide API information, and credentials are stored in Muse’s Secure Credentials Store. Meta also says it does not review custom connectors or how they use data. Check that your current client offers this flow, then give Muse the brief and the HTTPS address. Enter the bearer token only in the dedicated credential field; never paste it in ordinary chat. If there is no secure credential field or the permissions are unclear, stop.
05 | Verify the result with one harmless sample file
Put a manually created bridge-check.txt in the allowlisted folder with one line of text that contains no personal data. First check the local service in PowerShell. These commands read the token from its local file instead of putting its value in command text. Run $t = (Get-Content (Join-Path $env:USERPROFILE '.muse-bridge\token') -Raw).Trim(), then Invoke-RestMethod -Headers @{Authorization = ('Bearer ' + $t)} http://127.0.0.1:18790/api/health. The response should include ok, the allowed root names, and the read_only setting.
Open the public hostname in a browser as the README suggests. A 401 means the tunnel reached the local service, but the browser supplied no bearer token. In Muse, first ask it to list the one test root, then read bridge-check.txt and compare the returned text with the local file. The connector brief says all API requests require authentication. /api/list returns at most 5,000 entries, and /api/read is limited to 2 MB. The audit log records endpoint, root, relative path, and response code, so avoid sensitive names as well as sensitive file contents.
06 | Understand the allowlist and local traces
The server reads roots and read_only from config.json. Requests need an Authorization: Bearer header, the root must be one of the configured names, and the path must be relative to that folder. The source rejects absolute paths and paths that resolve outside the configured root. A new folder plus read-only mode keeps the trial small. Do not add C:\Users\your-name or an entire drive just to save a step; that would make many more files readable.
Common responses point to different fixes. 401 usually means the token was not entered correctly. 403 means a write was refused in read-only mode. 404 means the path or directory was not found. 413 means the project’s per-request size limit was exceeded, and 429 means rate limiting. The server’s audit.log stores paths and status codes, while server.log also records request lines. Keep those logs in a controlled local folder.
07 | If you need writes, narrow the writable area first
With read_only=true, the project returns 403 for /api/write and /api/mkdir. Its README recommends verifying read-only behavior before enabling writes. Back up anything important and point the allowlist at a separate, empty work folder. In Notepad, change read_only to false in %USERPROFILE%\.muse-bridge\config.json, then restart the MuseFileBridge API task in Task Scheduler. The project has no per-root read/write setting, so turning off read-only makes every configured root writable.
Start with a new test file and avoid overwrite requests against originals. The server creates missing parent folders and uses a temporary file before replacing the target. A write is limited to 10 MB. The API has write and mkdir endpoints but no delete endpoint; write can still replace a same-name file. Try a write only if your current Muse connector actually shows a write action. Do not assume write access from the presence of the folder connection alone.
08 | Stop the bridge and revoke access
To end a short trial, run powershell -ExecutionPolicy Bypass -File .\uninstall.ps1 from the extracted project folder. The script stops and removes the two scheduled tasks, which stops the local API and tunnel. It then asks whether to delete the config, token, and logs in .muse-bridge. The uninstaller leaves the allowlisted folder and its files in place. Also disconnect the custom connector in Muse and remove its saved credential.
If a token was pasted into chat or may have leaked, rotate it while the tunnel is still reachable. From the project folder, set MUSE_BRIDGE_URL to your HTTPS address and set MUSE_BRIDGE_TOKEN from the local token file, run python .\client\pcfile.py rotate-token, then clear both variables with Remove-Item Env:MUSE_BRIDGE_URL,Env:MUSE_BRIDGE_TOKEN. The client replaces the old token immediately and writes the new value only to the local token file. Never put the literal token in a command argument or prompt. Remove the old saved credential and update it only through a secure field. A named tunnel remains in the Cloudflare account after local uninstall; delete it there or with cloudflared tunnel delete muse-bridge if it is no longer needed.
References
These sources support the product information in this guide. Musevip is an independent publication and is not affiliated with Meta.
- [1] Muse File Bridge 1.0.1 README at the inspected commit
- [2] Muse File Bridge installer at the inspected commit
- [3] Muse File Bridge server implementation at the inspected commit
- [4] Muse File Bridge client and token rotation at the inspected commit
- [5] Muse File Bridge uninstaller at the inspected commit
- [6] Cloudflare Quick Tunnels documentation
- [7] Cloudflare Published Applications documentation
- [8] Meta Research: Muse connector and credential security design
- [9] Meta Help Center: Muse Connectors